
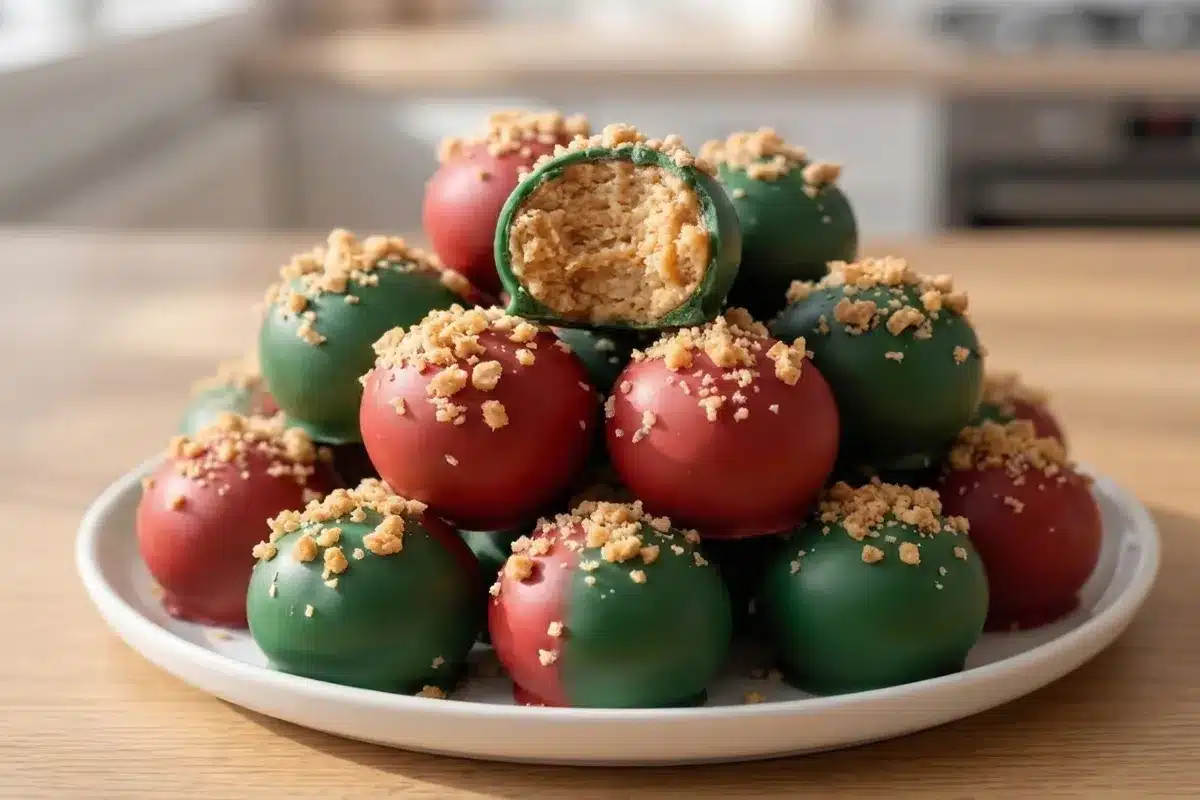
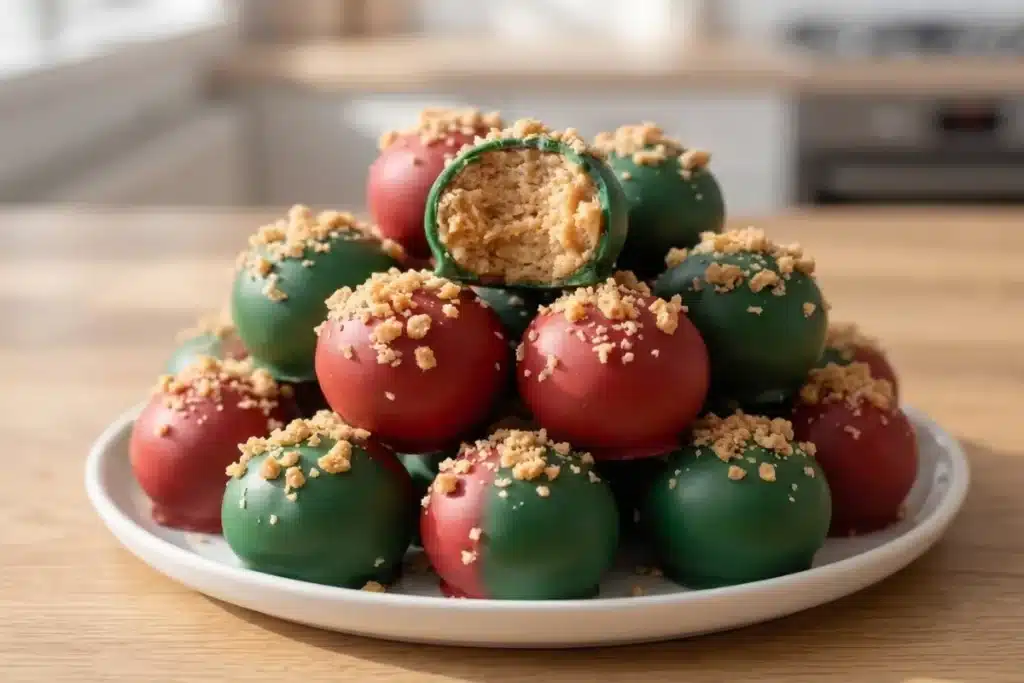
These festive Butterfinger Balls combine crunchy peanut butter candy, creamy peanut butter, and a sweet chocolate coating for an easy no-bake Christmas dessert. Finished in cheerful red and green colors with crushed Butterfinger pieces, these bite-sized treats are perfect for holiday cookie trays, Christmas parties, and homemade gifts!
Toffee Pecan Shortbread Cookies (Buttery, Crunchy & Melt-in-Your-Mouth)
Table of Contents
The Science Behind Holiday Butterfinger Balls
- Honeycomb Sugar Crisp Inclusion Mechanics: The iconic interior texture of Butterfinger candy bars consists of a laminated, aerated hard-candy lattice made from molasses, corn syrup, and roasted peanut butter. Crushing and folding these hard sugar-lipid flakes into creamy peanut butter creates a dual-texture candy matrix that retains its signature crunchy snap within a soft core.
- Hydrophobic Lipid Binding & Sucrose Solidification: Commercial creamy peanut butter contains hydrogenated vegetable oils that bind powdered sugar (sucrose and cornstarch) without adding free liquid water. The fine sucrose crystals absorb ambient oil phase moisture, transforming loose peanut butter into a firm, pliable dough matrix that sets solidly when chilled.
- Compound Coating Shell Crystallization: Using red and green candy melting wafers (palm kernel oil-based compound coating) avoids the requirement for cocoa butter tempering. The saturated vegetable fats solidify quickly upon chilling below 70°F (21°C), setting into a snappy, crisp outer barrier that seals moisture inside and prevents the peanut butter core from weeping.
| Prep Time | Chilling Time | Bake Time | Yield | Category |
| 20 mins | 35–40 mins | 0 mins (No-Bake) | ~24–30 balls | No-Bake / Holiday Candy & Treats |
Ingredients
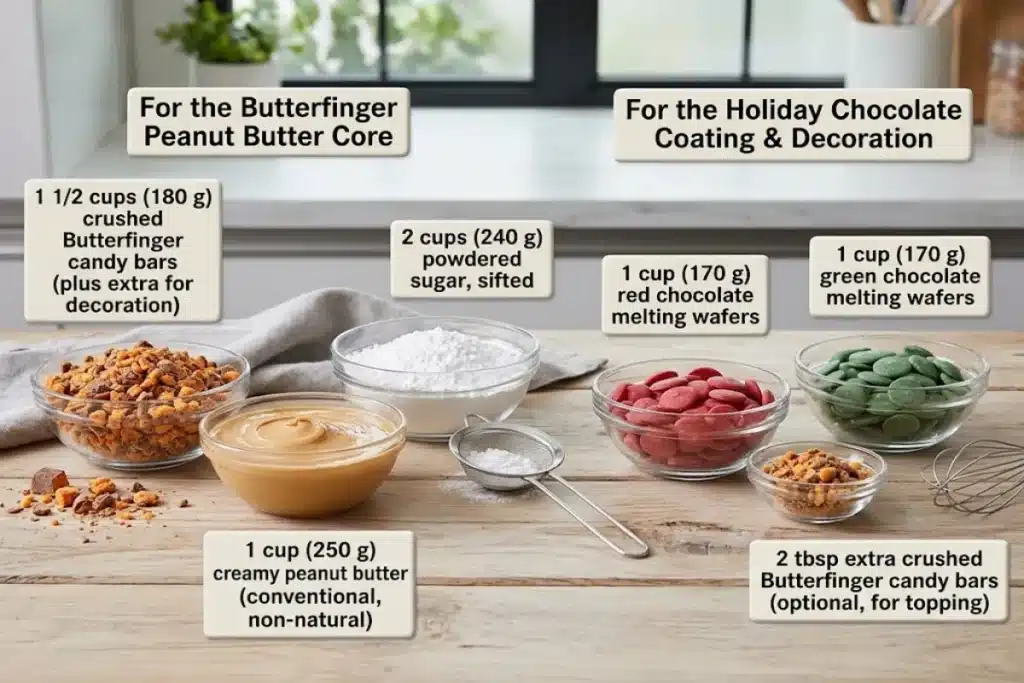
For the Butterfinger Peanut Butter Core:
- 1 1/2 cups (180 g) crushed Butterfinger candy bars (plus extra for decoration)
- 1 cup (250 g) creamy peanut butter (conventional, non-natural)
- 2 cups (240 g) powdered sugar, sifted
For the Holiday Chocolate Coating & Decoration:
- 1 cup (170 g) red chocolate melting wafers
- 1 cup (170 g) green chocolate melting wafers
- 2 tbsp extra crushed Butterfinger candy bars (optional, for topping)
Step-by-Step Instructions
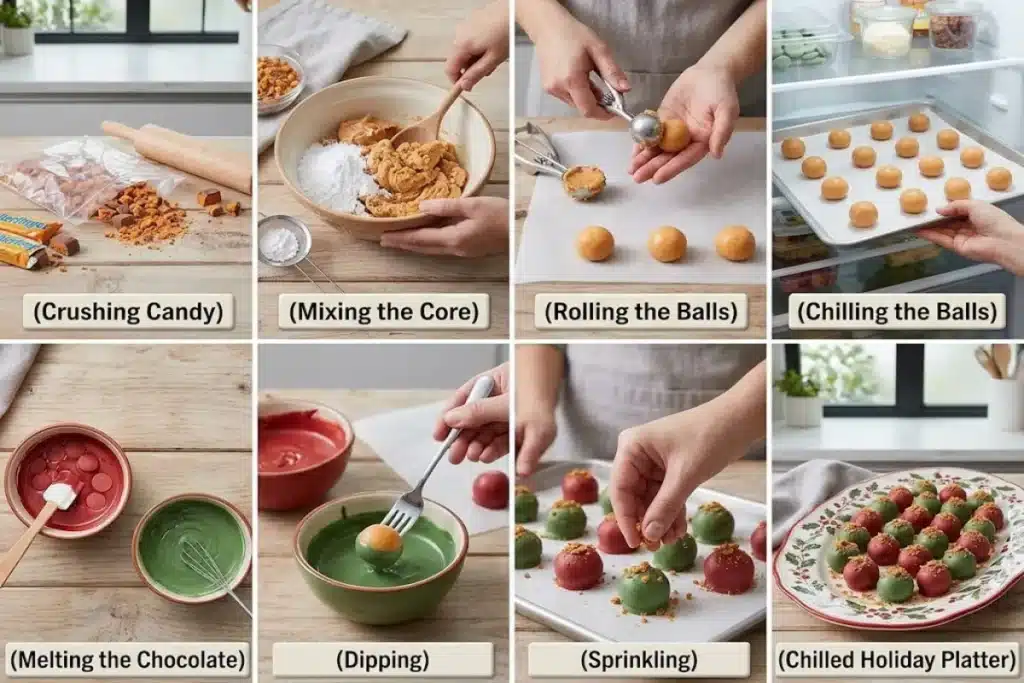
1.Crush Butterfinger Candies:Crush Butterfinger candy bars into fine crumbs.
Crush the Butterfinger candy bars into fine crumbs using a food processor or by placing them inside a sealed plastic bag and crushing them with a rolling pin. Reserve a small portion for decoration.
2.Mix Peanut Butter Core:Combine crushed Butterfingers, peanut butter, and powdered sugar.
In a large mixing bowl, combine 1 1/2 cups crushed Butterfingers, 1 cup creamy peanut butter, and 2 cups sifted powdered sugar. Stir thoroughly until a thick, cohesive mixture forms that holds its shape when pressed.
3.Portion and Roll Balls:Roll tablespoon-sized portions into smooth round balls.
Scoop tablespoon-sized portions (~20g each) of the peanut butter candy mixture and roll between your palms into smooth, compact balls.
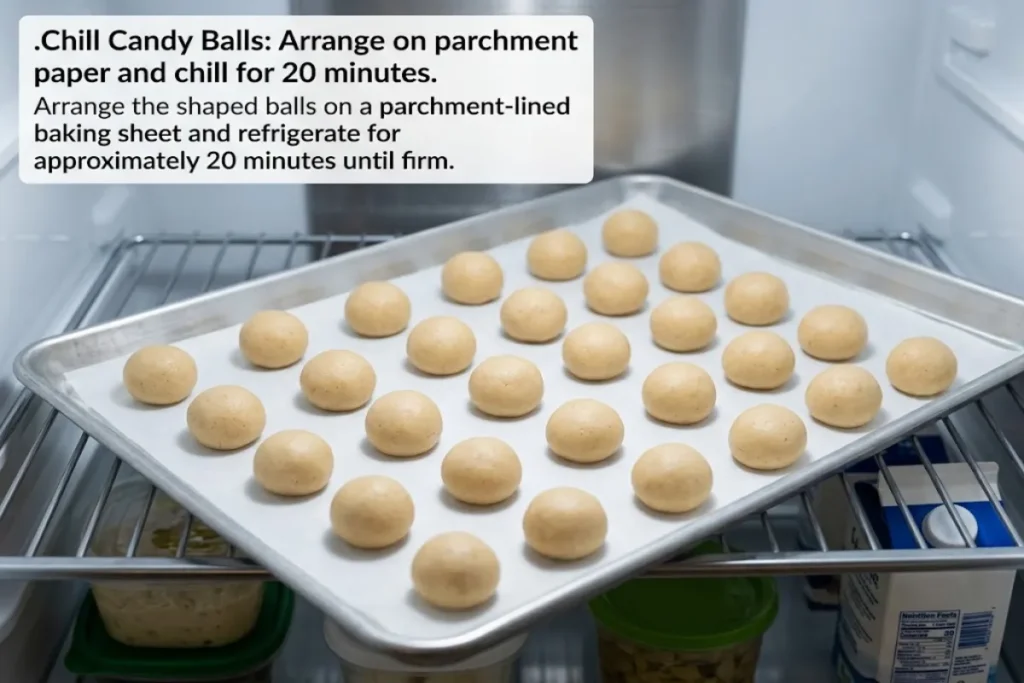
4.Chill Candy Balls:Arrange on parchment paper and chill for 20 minutes.
Arrange the shaped balls on a parchment-lined baking sheet and refrigerate for approximately 20 minutes until firm.
5.Melt Colored Chocolate Coatings:Melt red and green melting wafers in separate bowls.
Place the red and green melting wafers into separate microwave-safe bowls. Microwave in 20–30 second intervals, stirring between each interval, until completely melted and smooth.
6.Dip and Coat Candy Balls:Dip chilled balls into red and green chocolate coatings.
Using a fork or candy dipping tool, lower half of the chilled balls into the melted red coating and the remaining half into the green coating. Lift gently and let excess coating drip back into the bowl.
7.Decorate Top Shells:Sprinkle reserved crushed Butterfinger crumbs over tops.
Transfer dipped balls onto the parchment-lined sheet. Immediately sprinkle reserved crushed Butterfinger crumbs over the wet chocolate coating before it sets.
8.Set Coating and Serve:Refrigerate 15 to 20 minutes until set and firm.
Refrigerate for another 15–20 minutes until the chocolate shell is completely firm. Transfer to a festive platter and serve chilled!
Pro Tips for Making Success
- Use Conventional Creamy Peanut Butter: Always use standard commercial creamy peanut butter (such as Jif or Skippy). Natural peanut butter contains separated peanut oil that renders the filling greasy and soft.
- Keep Core Balls Thoroughly Chilled: Make sure the rolled peanut butter balls are cold before submerging them in warm melted chocolate. Cold centers keep their spherical shape without melting into the dipping bowl.
- Top with Sprinkles Immediately: Add reserved crushed candy crumbs right after dipping each individual ball; compound candy coatings set rapidly, and toppings will not stick once the surface hardens.
Frequently Asked Questions
What are the ingredients for no-bake Butterfinger balls?
The essential ingredients are crushed Butterfinger candy bars, creamy peanut butter, sifted powdered sugar, and colored chocolate melting wafers (red and green) for dipping, plus extra candy crumbs for garnish.
What is the inside of a Butterfinger called?
The crisp, flaky interior of a Butterfinger bar is a laminated peanut butter candy matrix, often called a crispy peanut butter honeycomb or peanut butter molasses flake. It is created by folding roasted peanut butter into a boiled, aerated sugar-molasses syrup.
What allergens are in Butterfinger candy bars?
Butterfinger candy bars contain peanuts, milk, and soy. They are produced in facilities that handle tree nuts and wheat, so individuals with severe peanut, dairy, or soy allergies should avoid them.
Can you give me an easy recipe for Butterfinger balls?
Yes! Combine 1 ½ cups crushed Butterfingers, 1 cup creamy peanut butter, and 2 cups powdered sugar. Roll into 1-inch balls, chill for 20 minutes, dip into melted chocolate or candy wafers, top with extra crushed candy, and refrigerate for 15 minutes until set.
Print
Holiday Butterfinger Balls (No-Bake Christmas Treats)
- Total Time: 1 hour 5 minutes
- Yield: Approximately 32 Butterfinger peanut butter balls 1x
- Diet: Vegetarian
Description
These No-Bake Christmas Butterfinger Peanut Butter Balls are irresistibly creamy, wonderfully crunchy, and covered in festive red and green chocolate! Made with crushed Butterfinger candy bars, rich creamy peanut butter, and powdered sugar, these easy homemade Christmas candies feature a thick, sweet peanut butter center filled with delicious crispy candy pieces. Each bite delivers the perfect combination of smooth peanut butter, crunchy Butterfinger toffee-like layers, and a delicate chocolate-flavored candy shell. Dipped in vibrant red and green melting wafers and finished with a sprinkle of extra crushed Butterfinger candy, these colorful holiday treats look beautiful on any Christmas dessert platter. With no oven required and just a handful of simple ingredients, they are perfect for Christmas candy trays, holiday parties, homemade edible gifts, festive cookie exchanges, or making sweet treats with family. Their cheerful colors, rich peanut butter flavor, and irresistible crunchy centers make these Butterfinger candy balls a holiday favorite!
Ingredients
- For the Crunchy Butterfinger Peanut Butter Centers:
- 1 1/2 cups (180 g) crushed Butterfinger candy bars, plus extra for decoration
- 1 cup (250 g) conventional creamy peanut butter, such as Jif or Skippy, not natural peanut butter
- 2 cups (240 g) powdered sugar, sifted
- For the Festive Red and Green Candy Coating:
- 1 cup (170 g) red chocolate melting wafers
- 1 cup (170 g) green chocolate melting wafers
- 2 tbsp extra crushed Butterfinger candy bars, optional, for sprinkling over the tops
Instructions
- Crush the Butterfinger Candy Bars into Fine Crumbs: Unwrap the Butterfinger candy bars and break them into smaller pieces. Place the candy pieces in a food processor and pulse several times until they form fine, evenly sized crumbs with a few tiny crunchy bits remaining. Alternatively, place the candy pieces inside a sturdy, sealed plastic bag and gently crush them with a rolling pin until finely broken down. Measure 1 1/2 cups (180 g) of crushed Butterfinger candy for the peanut butter filling and reserve an additional 2 tablespoons of crumbs if you plan to decorate the finished candy balls. Finely crushed candy blends more evenly into the filling and helps the mixture hold together when shaped into smooth, compact balls.
- Combine the Butterfinger Crumbs, Creamy Peanut Butter, and Powdered Sugar: In a large mixing bowl, combine 1 1/2 cups (180 g) of finely crushed Butterfinger candy bars, 1 cup (250 g) of conventional creamy peanut butter, and 2 cups (240 g) of sifted powdered sugar. Using a sturdy wooden spoon or rubber spatula, stir thoroughly until all the ingredients are evenly incorporated and a thick, cohesive candy mixture forms. Scrape down the sides and bottom of the bowl to incorporate any remaining powdered sugar. The filling should feel firm yet slightly pliable and hold together when gently pressed between your fingers. The creamy peanut butter binds the powdered sugar and crunchy candy crumbs into a rich, sweet center with a delightful contrast of smooth and crispy textures.
- Portion and Roll the Peanut Butter Candy Mixture into Balls: Using a tablespoon or small cookie scoop, divide the prepared Butterfinger peanut butter mixture into approximately 1-tablespoon portions, around 20 g each. Gently squeeze each portion between your palms to compact the filling, then roll it into a smooth, round ball. If the mixture appears slightly crumbly, press the crumbs together firmly before rolling so the candy balls maintain their shape. Continue portioning until all the mixture has been used, keeping the balls as uniform in size as possible for consistent chocolate coating and an attractive holiday presentation.
- Chill the Butterfinger Peanut Butter Balls Until Firm: Line a large baking sheet or tray with parchment paper. Arrange the shaped Butterfinger peanut butter balls on the prepared surface, leaving a little space between each one. Transfer the tray to the refrigerator and chill for approximately 20 minutes, or until the balls feel firm and hold their rounded shape comfortably when lifted. This chilling period is important because cold peanut butter centers are easier to dip into the warm melted candy coating without breaking apart, flattening, or leaving crumbs behind in the chocolate.
- Melt the Red and Green Chocolate Coating Wafers Separately: Place 1 cup (170 g) of red chocolate melting wafers in one microwave-safe bowl and 1 cup (170 g) of green chocolate melting wafers in a second microwave-safe bowl. Microwave one bowl at a time in short intervals of approximately 20–30 seconds, removing the bowl and stirring thoroughly between each interval. Continue heating gently until the wafers are completely melted and the coating becomes smooth, glossy, and fluid enough for dipping. Repeat with the second color, keeping the red and green coatings separate to preserve their bright festive appearance. Avoid overheating the candy wafers, which can cause the coating to become thick, scorched, or difficult to work with.
- Dip the Chilled Peanut Butter Balls into Red and Green Coatings: Remove the chilled Butterfinger peanut butter balls from the refrigerator. Using a fork or candy dipping tool, carefully lower approximately half of the balls into the bowl of smooth melted red coating, turning gently until completely covered. Lift each ball from the coating and allow the excess to drip back into the bowl, lightly tapping the fork against the edge if necessary. Transfer the coated ball to the parchment-lined baking sheet. Repeat with the remaining candy balls using the melted green coating so the finished batch contains an attractive assortment of vibrant red and green Christmas candies. Work carefully to maintain the rounded shape of the chilled centers and keep loose Butterfinger crumbs out of the melted coating.
- Decorate the Wet Candy Shells with Crushed Butterfinger Pieces: Immediately after placing each freshly dipped candy ball onto the parchment paper, sprinkle a small amount of the reserved crushed Butterfinger candy over the top of the still-wet coating. Use the optional 2 tablespoons of extra crushed Butterfinger pieces, distributing them evenly across the red and green candy balls. Work one ball at a time rather than dipping the entire batch before decorating, because candy melting wafers can begin setting quickly. The crunchy topping adds a beautiful finishing touch, provides a hint of the delicious filling inside, and makes the colorful Christmas candies look especially festive and inviting.
- Refrigerate Until the Chocolate Shells Set and Serve Chilled: Once all the Butterfinger peanut butter balls have been dipped in the red and green coatings and decorated with the reserved candy crumbs, place the parchment-lined baking sheet back into the refrigerator. Chill for approximately 15–20 minutes, or until the chocolate-flavored candy shells become completely firm and no longer feel tacky. Carefully lift the finished candy balls from the parchment paper and arrange them on a festive serving platter or in decorative miniature paper candy cups. Serve chilled for the best combination of a crisp, colorful outer shell and a rich, creamy peanut butter center packed with crunchy Butterfinger pieces. Store any remaining candies in an airtight container in the refrigerator until ready to enjoy or share as homemade Christmas gifts!
Notes
- Use Conventional Creamy Peanut Butter: Choose a standard commercial creamy peanut butter, such as Jif or Skippy, rather than natural peanut butter. Conventional creamy peanut butter has a more stable, uniform consistency, which helps the powdered sugar and crushed Butterfinger candy form firm, cohesive centers. Natural peanut butter can separate and release excess oil, making the filling greasy, soft, or difficult to shape.
- Keep the Peanut Butter Centers Thoroughly Chilled: Refrigerate the rolled Butterfinger balls for approximately 20 minutes before dipping them into the melted red and green coatings. Firm, cold centers retain their rounded shape more easily and are less likely to soften, crumble, or fall apart when submerged in the warm candy coating.
- Add the Butterfinger Topping Immediately After Dipping: Sprinkle the reserved crushed candy crumbs onto each coated ball while the red or green shell is still wet. Candy melting wafers can set quickly, and toppings may not adhere once the surface has hardened. For the neatest finish, dip and decorate one candy ball at a time.
- Crush the Butterfinger Bars into Fine, Even Crumbs: Use a food processor or a sealed plastic bag and rolling pin to break the candy bars into small, uniform pieces. Finely crushed Butterfinger candy blends smoothly into the peanut butter and powdered sugar mixture, while tiny crunchy fragments preserve the signature crisp texture of the filling.
- Reserve Extra Candy Crumbs Before Mixing: Set aside the optional 2 tablespoons of crushed Butterfinger candy bars for decoration before preparing the filling. Keeping the topping separate ensures you have enough crunchy pieces to sprinkle over the colorful shells immediately after dipping.
- Sift the Powdered Sugar Before Adding It: Sift the 2 cups (240 g) of powdered sugar to remove lumps before combining it with the creamy peanut butter and crushed Butterfinger candy. Fine powdered sugar incorporates more evenly and helps create a smooth, cohesive filling without dry sugar pockets.
- Mix Until the Filling Holds Together: Stir the crushed Butterfinger candy, creamy peanut butter, and powdered sugar thoroughly until the mixture becomes thick and cohesive. If it appears crumbly at first, continue pressing and folding the ingredients together with a sturdy spatula until the peanut butter has evenly coated the dry ingredients.
- Compact Each Candy Ball Before Rolling: Gently squeeze each tablespoon-sized portion of filling between your palms before rolling it into a smooth sphere. This helps bind the crunchy candy crumbs and powdered sugar together and reduces the chance of the centers cracking or falling apart during dipping.
- Keep the Candy Balls Uniform in Size: Use approximately 1 tablespoon of filling, around 20 g, for each ball. Evenly sized portions make the candies easier to coat and give the finished Christmas platter a beautiful, consistent appearance.
- Use Candy Melting Wafers for Bright Holiday Colors: Red and green chocolate-flavored melting wafers create festive candy shells without needing to color ordinary chocolate. Melt each color in a separate microwave-safe bowl to keep the coatings vibrant and avoid accidental blending.
- Melt the Coatings in Short Microwave Intervals: Heat the red and green candy wafers in separate bowls for approximately 20–30 seconds at a time, stirring thoroughly between intervals. Gentle, controlled heating helps maintain a smooth dipping consistency and prevents overheating or scorching.
- Avoid Introducing Water into the Melted Coating: Keep the microwave-safe bowls, forks, and dipping tools completely dry when working with the melted candy wafers. Excess moisture can affect the consistency of some chocolate-based coatings and make dipping more difficult.
- Dip with a Fork or Candy Dipping Tool: Lower each chilled peanut butter ball into the melted coating using a fork or dipping tool. Turn gently until fully coated, then lift and let the excess drip back into the bowl. This creates a smoother, more even shell without leaving thick pools of coating around the base.
- Work with Small Batches if the Kitchen Is Warm: If the peanut butter centers begin softening while you dip, return the undipped portions to the refrigerator and continue working with a smaller number at a time. Keeping the filling cold makes the dipping process easier and helps the candies retain their shape.
- Use Parchment Paper for Easy Release: Place the freshly dipped candy balls on a parchment-lined baking sheet. Once the coating has set, the candies should lift away more easily without damaging their colorful shells or leaving excess chocolate attached to the tray.
- Allow the Coatings to Set Completely: Refrigerate the decorated candies for approximately 15–20 minutes, or until the red and green shells are firm and no longer tacky. Avoid handling or stacking the balls before the coating is fully set, as this can leave fingerprints or damage the decorations.
- Store in an Airtight Container: Once the chocolate-flavored coating has hardened completely, transfer the Butterfinger peanut butter balls to an airtight container. Keep them refrigerated to preserve their firm centers and attractive candy shells. Separate layers with parchment paper if needed to prevent sticking or damage.
- Perfect for Homemade Christmas Candy Gifts: The vibrant red and green coatings make these no-bake Butterfinger peanut butter balls especially festive for Christmas candy trays, holiday dessert platters, homemade edible gifts, and seasonal parties. Arrange them in miniature paper candy cups or decorative holiday tins for a charming presentation.
- Serve Chilled for the Best Texture: These candies are particularly delicious when served chilled, as the outer shell remains firm and the peanut butter center stays compact and creamy. The combination of smooth peanut butter, crunchy Butterfinger pieces, and colorful chocolate-flavored coating creates a wonderful contrast in every bite.
- Prep Time: 25 minutes
- Cook Time: 0 minutes
- Category: Dessert
- Method: No-Bake
- Cuisine: American
Nutrition
- Serving Size: 1 Christmas Butterfinger peanut butter ball
- Calories: 175
- Sugar: 16g
- Sodium: 75mg
- Fat: 9g
- Saturated Fat: 4g
- Unsaturated Fat: 4g
- Trans Fat: 0g
- Carbohydrates: 23g
- Fiber: 1g
- Protein: 3g
- Cholesterol: 0mg